This long long post details some homemade modifications, repairs and fixes I have done over the years.
My wallet is not a bottomless pit full of money, as many boats are. So if you think some projects suffer from lack of funds or not hiring the "expert" you would be right.
Due to the fact that this is a free blog site and subject to limitations, I am forced to make all my entries on this topic as one long page. This means readers must scroll forever if I choose to include lots of stuff. The most recent additions will be at the far end.
To help spot topics I will highlight projects and important things with big bold headlines.Dumpster Diving is not my favorite pastime and is soundly ridiculed by some around me, but has resulted in some great finds. That rich guy with the big yacht that always has a drink in his hand throws in the marina dumpster all his worthless ( to him ) discards.
I have retrieved old bimini pieces and parts such as, stainless tubing, rail fittings, perfectly good Sunbrella, teak tables, teak galley racks, light fixtures, miles of line, life-jackets.
Did you know that the webbing and snap buckle stripped from an old pfd makes an excellent sail tie? The foam flotation has a myriad of uses. While some less fortunate people are grabbing the bottles for the deposits, I'm going for the gold. Once I made an excuse to toss out something just to check out a dumpster.

Results: Two weeks later I have a professional looking (that is if you accept fittings versus welded as professional) pulpits, front and back with lifelines running up the sides.
Costs: $950+- in materials, $135 tube bender, $200 for a new Rigid combo driver impact set.
OK, I cant really count the cordless driver as part of the costs, but the bender was required. I later sold it for $100, total cost $35 was money well spent.
Poor mans transponder installation:
Lets face it, drop boards are a pain in the neck. At home we close the door, why not on the boat.
One day I was admiring a camping tent rain fly and it hit me "why can't I fly a rain fly over my cockpit and leave out the tent?" So later on I took a few minutes to dig out an old dome tent with those flimsy fiberglass poles and instantly had a bimini flying over me. Now all I had to do was figure out how to get it to stay up there and not look like some dome tent gone wild or a covered wagon.
Pictures are on the way.
Ships Bell
I'm working on reusing an old door bell chime. One of the big old ones with four long brass tubes. So far I've cut one tube down to about 16 inches. Now I looking for a way to hang it outside on the pilothouse wall. I need a way to keep it from swinging (clanging) and then I need a mallet to whack it with. More later.
Follow up: Linda complains, the sound annoys her I guess, it's gone. I'm thinking of getting an ooga horn now, well see how that works out!
No more broken light bulbs
No more broken trouble-light bulbs is what I really mean.
If you are like me you bang your worklight and then blink it's lights out. I switched to LED bulbs, not only are they tough as nails, they don't get very hot and draw such little power I can run them off my little plug in inverter
Bamboo Curtains

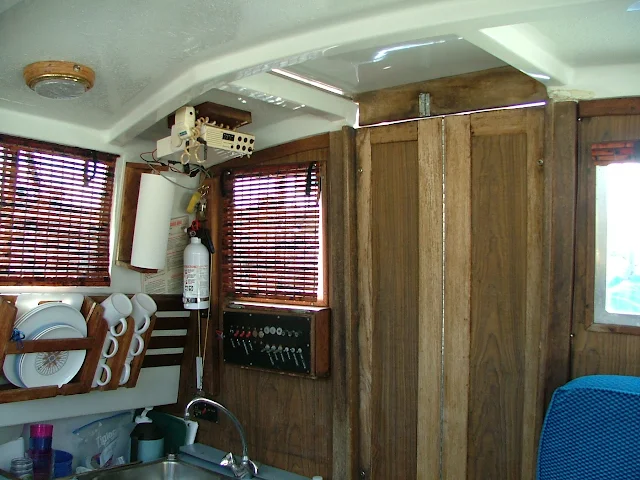
In these pictures, take a look at the bamboo curtain window coverings. The window on far right is rolled up and secured, above sink they are hanging down.

Ignore the wine rack, were talking curtain above the glasses
(okay, now look closely at the wine rack, it's regular cheap pine wood, coated with mahogany Minwax polyurethane stain, zero cost plus time since all materials were left over's)
(okay, now look closely at the wine rack, it's regular cheap pine wood, coated with mahogany Minwax polyurethane stain, zero cost plus time since all materials were left over's)
 |
| Look above the windows to see rolled up Bamboo, the table folds up covering the shelves. It also unfolds making it twice as wide. See the heavy black velcro strip hanging loose? Many boats have a table that folds onto the bulkhead, this modification was simple, it's standard on lots of boats. The horrible speakers are from a previous owner. |
Curtains: This is what I did.
I purchased from Lowes a roll up patio door cover made of woven bamboo strips. They come in about four or five colors and are available in many sizes from a little window size to a sliding patio door size.
Since I needed to cover six windows I purchased a big one for $75+- and then whacked it up into little pieces.
- BUT before cutting anything I used a hot melt glue gun to secure all the soon to be severed threads figuring there would be no way to re-weave things once I started cutting.
- the bamboo strips fold nicely back on themselves so I made each curtain a little long and created a hem so to speak at the top and bottom with more hot melt.
- To cut the bamboo to width I tried several unsuccessful methods, scissors don't work, razors don't work, table saws, sawzall, jigsaw, nothing looked clean enough for me until I hit it with a sharp chisel and cut one strip at a time. After some experimenting with the blade angle and chopping block I was able to make perfect cuts. Then I learned to use a straight edge because the bamboo wants to slide around some.
- For securing above window I drilled two tiny holes in the bamboo and in fiberglass being careful not to under-size the bamboo holes because forcing a screw into bamboo splits it, oh crap.
- before attaching to boat wall I took a short piece of Velcro hooker and hookee, and attached it with the same two screws, now I can roll up the curtain and secure it leaving my window 100% unobstructed.
- One problem with system is with tilting walls and who doesn't have crooked walls, the curtain wants to hang down and out into cabin. My solution was a little tab of Velcro at bottom near each side using a screw in the fiberglass and I switched to epoxy on the bamboo because hot melt didn't stick well to the Velcro.
You can buy many types of roll up blinds besides bamboo, some blinds come with a cloth liner for privacy and/or shading but I liked the look of the unlined best and for privacy, plus trimming (hemming) a liner would complicate things to no end. Besides, no one can see through them unless they stick their nose up against the window.
After my share of mistakes with bent A-frames and unwieldy gin poles,
Mast raising without a crane
From time to time one must step or unstep a mast without a convenient spar or crane nearby.After my share of mistakes with bent A-frames and unwieldy gin poles,
I settled on this system that uses readily available equipment. (the key is an aluminum ladder)
I'm not going to go into little details. (there are plenty) If a person is capable of this kind of work, he /she already knows what it takes. Don't try this if you're not sure of your abilities, please get some help.
I'm not going to go into little details. (there are plenty) If a person is capable of this kind of work, he /she already knows what it takes. Don't try this if you're not sure of your abilities, please get some help.
 |
| This ladder was a 28 foot extension and was still too short. (The boat was already eight feet off the ground ) so a carefully hand-picked 4x4 extension was pushed nearly to its breaking point. |
 |
| These ladders are heavy duty 32 footers and sitting on the deck, we used a five part block and tackle run to a winch. Don't do this unless you are comfortable rigging, any number of things can go wrong or be overlooked. This two ladder a-frame was super strong and stable for the very heavy mast. I believe there were eight lines holding the ladders in column plus numerous ties downs. We raised the ladders one step at a time, adjusting lines as the tower moved back and forth . Doing this stunt in a slip would complicate things immensely but would be doable with enough rope and a clear head. for more info on this project go to "The New Bombay Pilothouse Project" or click here >>New Bombay Project |
Hiding surface wire
When running wires to my new inside lights, I immediately discovered that extending the existing circuit overloaded the breaker so I was forced to run new wires from the panel and that's when the problems began.
After much tearing apart and using wire fishes, I finally managed to get a new wire run to the port side of the boat, but when I looked for a suitable route to the starboard side I ran into one roadblock after another. Then I looked up and thought why not go right over the ceiling, after all it was the shortest distance, and we all know that long wire runs eat up the available juice. The problem routing over the ceiling was that the tongue and groove boards were never put up so that they would come apart without sustaining damage. My simple answer not only worked great but added some pizzazz to my ceiling.
Check out the picture below.
My boat worked very well for this treatment with its wood interior, but the idea may lend itself to other boats. I can see an upholstered tube or a carpet fold made to hide a wire. I can also envision an overhead safety rail (grab handle) fashioned to hide a wire. I have seen outside stainless tubing with wires inside for running lights. If you must run a wire on the surface you can blend it in by very carefully choosing your color, shape, attachment, and route for an acceptable outcome.
4/6/13
I went online and found several products to choose from, clicked add to my cart, and now my installation is complete. The only news I have so far is that the product I chose is a little rough on bare feet and bony knees, but tolerable.
I will report later the issues I discover, oh yeah what I bought cost $3.38 sq ft. and comes in 12" squares that hook together. I made an exact paper pattern and then cut it with pruning shears.
Check out the picture below.
 |
| There it is, a hollow batten strip with my 14 gauge wire inside. Five minutes with the table saw and the wire neatly reappears over yonder. |
4/6/13
Cockpit floor mat
OK - here's the problem. The floor in the cockpit gets wet, then our feet get wet, then we track wet inside. Then the rain quits or seas settle, but the carpet remnants we scatter about stay wet like a sponge for hours or days.
I went online and found several products to choose from, clicked add to my cart, and now my installation is complete. The only news I have so far is that the product I chose is a little rough on bare feet and bony knees, but tolerable.
I will report later the issues I discover, oh yeah what I bought cost $3.38 sq ft. and comes in 12" squares that hook together. I made an exact paper pattern and then cut it with pruning shears.
 |
| My painted floor is beigish tan, if I were to do it again I would choose a tan mat to minimize the contrasting look, or I could simply paint the sole brick red (not likely) |
 |
| A requirement was that the mat be flexible and fold back giving access to hatches |
Disappearing Tiller Trick
If you have a transom hung rudder and a four foot long tiller sticking into your cockpit, you know sometimes it's like having an extra crew that's always in the way. Sometimes they can be lifted and tied to the backstay, (no, not the crew) but not all lift that far. My solution for my Cat 25 was to modify the attachment where the tiller pivots on the rudder.
Reality checks: I don't want to do without. I cant find any used stuff that I like. The one fab shop out of ten or more I contacted that actually gave me a quote was $4,500 not installed. Ouch
So I ran down to Harbor Freight, bought a tubing bender, picked up at Home Depot four pieces of emt (electrical metallic tubing) and proceeded to teach myself how to ruin tubing.
 |
| Look carefully and you can see that the tiller is trapped in a starboard sleeve using the factory aluminum connection. The wing nut was not needed once the proper friction fit was established. The bolts are padded with vinyl tubing to protect the brightwork. This was not a sloppy fit as one might think, there was zero play and it still lifted normally. |
 |
| With the tiller slid out the back, the cockpit is completely clear. The "Tiller pilot" pin conveniently acts as a stop. A quick and easy yank forward and the tiller is ready to go. I used this system for four years and was super happy with it. With adjustments this system should be adaptable to just about any transom hung rudder and tiller setup. On the Cat 25, lifting the tiller out of the way was impossible due to the close traveller shown in picture. |
Bending Stainless steel tubing for new safety railings
First some background, I acquired a "new to me" boat without bow or stern pulpits, (and some other missing stuff ) and I assumed I could, No. 1 find some used railings, No. 2 hire a fabricator, No. 3 do without. (1st mistake) So when I made my offer to buy the boat I didn't really consider the missing bow pulpit a big deal.Reality checks: I don't want to do without. I cant find any used stuff that I like. The one fab shop out of ten or more I contacted that actually gave me a quote was $4,500 not installed. Ouch
So I ran down to Harbor Freight, bought a tubing bender, picked up at Home Depot four pieces of emt (electrical metallic tubing) and proceeded to teach myself how to ruin tubing.
Results: Two weeks later I have a professional looking (that is if you accept fittings versus welded as professional) pulpits, front and back with lifelines running up the sides.
Costs: $950+- in materials, $135 tube bender, $200 for a new Rigid combo driver impact set.
OK, I cant really count the cordless driver as part of the costs, but the bender was required. I later sold it for $100, total cost $35 was money well spent.
I may organize this blog entry later but right now I just want to get on paper some thoughts.
- One-inch SS mirror finish tubing is available in thin and a little less thin (049-065) wall thickness. I used .062 and it cost $75 per 20-foot piece at Alaska Brass and Copper
- Mirror finish scratches really easily, so my new rails already look like they have been on the boat for years.
- Sea Dog and Victory fittings are readily available and set me back $500
- Set screws are easy to lose when making adjustments so I removed all of them for safekeeping, then I used Loctite for final tightening.
- The bending dies are cheaply finished and tend to mar the tube, especially on short radius bends. (wrapping with tape helped but created its own mess)
- It took two people for many of the bends, one to bend, the other to stand on things and hold the ends of tubes at the right angles.
- There is definitely a minimum radius possible, and you will ruin (flatten) a bend when you try to push your luck. For one inch it was around nine nine-inch radius. Experimenting with emt will not give the same results as the real thing, but is worth practicing with.
- Very, very helpful hint >>You cannot change bend radius as you bend without it showing unless you smoothly adjust die as you roll tube, but you are guessing and each time I tried it I screwed up. Hint, when you have a bend such as on the bow where it gets tighter as you move forward you should bend entire tube to minimum radius required. (this means your bending it too much for some of the distance, this is ok) Then have your helper stand on it while you unbend it. (straighten) You see the bender easily makes a very nice uniform bend and you can easily and uniformly unbend just the portion you want. I used a cardboard template matching the bow curve, then simply unbent the tube until it was a perfect fit. I made a template for the stern also, then flipped them for port and starboard. Luckily the boat was the same on both sides, whew.
- Tee fittings will slide onto straight tube, but will jam sliding onto curved tube. I experimented to determine how much bend a fitting would clear. (about half way up to the bow) On all my rails I had to plan ahead and slide one fitting past a soon to be bent area. (more lost set screws) There is a hinged tee available for about $30 that will solve this issue but I did not need to resort to using any.
- Watch out - when using bender, watch out for inadvertently making a corkscrew bend. I marked up direction on tubes and had helper hold tube in proper alignment while bending other wise they tend to corkscrew. I don't know if the machine was off or its a normal problem, but there is no adjustment, so pay attention.
- Measuring tubing, good luck, (practice on the emt will help) I planned all my bends to end up with a little straight piece left over that I would cut off or adjust stanchion mounting position later. ( this means don't pre-drill the last plate location until your positive) On one rail bend I intentionally started with six inches extra to cut off later. When I finished I had nothing to cut off, I don't know where it went or how I goofed, but I was real lucky I didn't end up buying another $75 stick.
- When bedding the stanchion plates, I forced polyurethane sealant down the pre-drilled, pre-fitted screw holes allowing the excess to ooze out around the screws and plates. If there was no ooze out I added more, then in a few days when the sealant was partially cured it easily stripped off leaving a clean edge. (in my opinion, rtv or silicone rubber sealant has no use other than to make glass aquariums)
- My new impact driver is a great tool, but I need to learn a few lessons. My first bad experience is its ability to break off screws, something my old drill driver never did with its adjustable clutch.
- The key to not breaking screws is to properly size and drill pilot holes. (learn this the hard way if you must) I finally wised up and hand tightened all the rest, after zipping them in most of the way using the driver.
- When drilling out broken screws I made and used a steel template that matched my four hole stanchion base. With three sound screws holding the template, I drilled through the fourth hole to remove the broken stub all the time praying I would not break the drill bit greatly compounding my mistakes.
- Once the broken screw stub is gone and the fiberglass is ruined it will no longer hold a #12 screw, so I forced JB weld into the damaged area, and then before it fully hardened threaded in and out a screw creating threads. The next day I inserted and fully torqued the screw and it works great. JB makes several marine and nautical sounding epoxy products. The three screws I broke (two with the new impact tool and one by hand, (never learn some things) added about four hours to this project) I knew forty years ago to properly size a pilot hole, but sometimes you just get in a hurry, or I'm a slow learner.
- A feel-good word for do-it your-selfers. "A good mechanic can fix his mistakes so no one knows" (no, not auto mechanic) In this sense a mechanic is a tradesman, craftsman, artist or technician who uses tools to build, create and repair stuff. (artist?)(boat nut)
I'll be adding some pictures later, I just had to get some copy done.
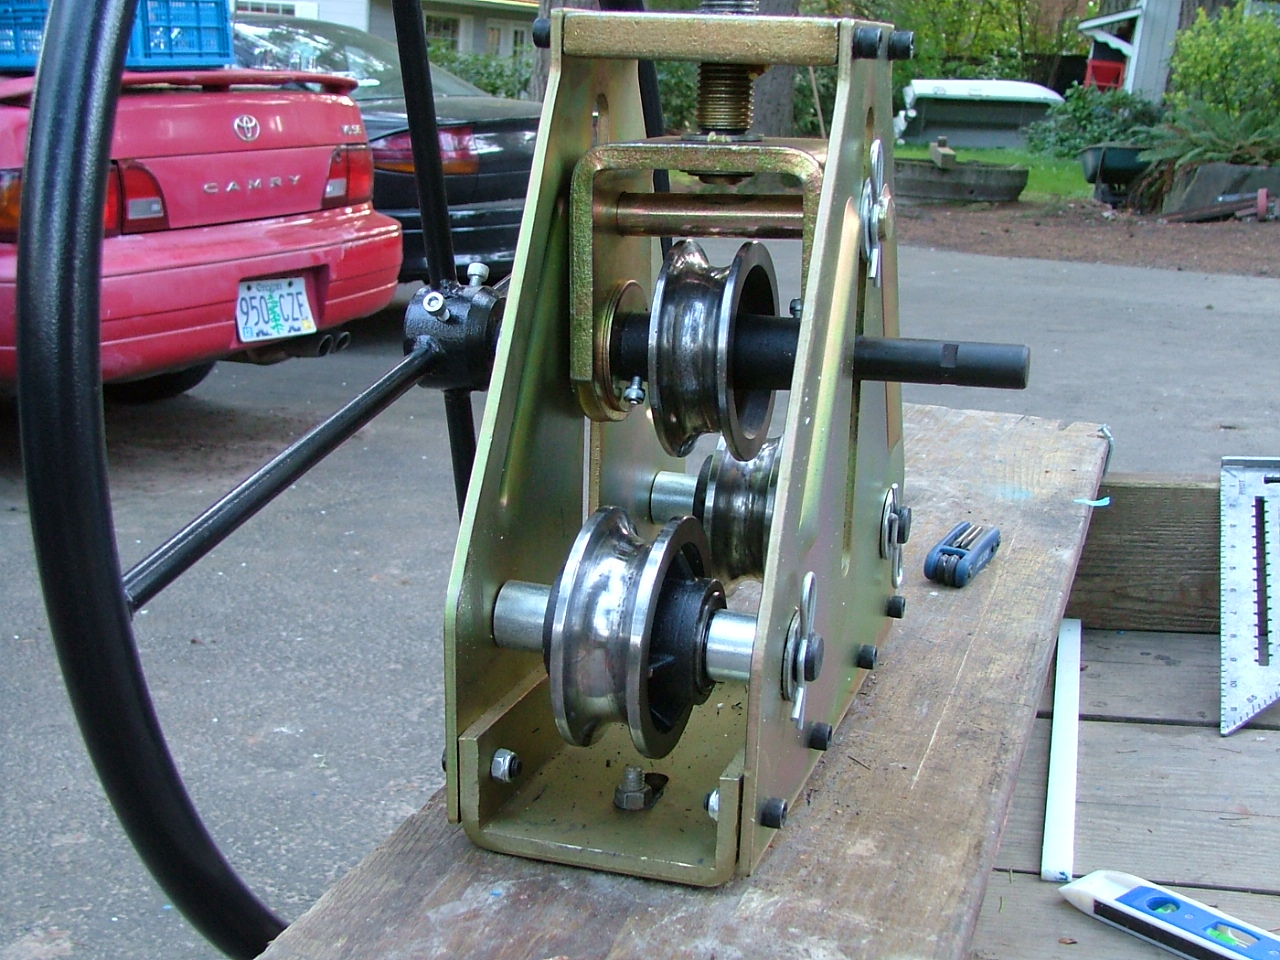 |
| $137.00 at Harbor Freight w/coupon (comes with 1" rollers in pic) |
 |
| Each time you pass it through, you tighten screw a little and pass again. (blue tape marks end of bend) My flatbed trailer makes a great work bench. |
 |
| The speed square is 12" and this is a good looking bend, the piece behind is a much tighter radius and flattened, I tossed it out. |
 |
| The cardboard was my pattern taken from boats stern gunwale. One tee fitting had to be slipped on before the bend was made. I cut both ends to length after the bends were completed since I didn't know the exact length. I drilled and mounted the stanchion fittings on the boat afterwards for same reason. (close is not an option) Red and blue tape marked important points. |
 |
| I could have used larger screws, but I already had these, they will hold a dab of water. Cutting a sloping shim out of starboard is easy and solved the angle issue. |
 |
| Practicing with cheap emt tube was a good idea, but bends a little different and doesn't fit the dies very well. Never the less I recommend doing the exercise. I made practice rails front and back to get a good look at the angles. |
 |
| This reinforced stanchion base is pre canted at 4 degrees inward but I still needed a shim sloped in two directions to get the look I wanted. The shim is Starboard. |
I
Lifelines on the cheap:
After learning to bend SS tube I needed to create some lifelines.
Here's where you can really get frustrated. I wanted 1/4" vinyl cables because I've always thought the 3/16" ones on my boats never looked anything but really skinny, and hurt my legs when pushed against. My new lines were 3/8" overall and looked it. (3/8" looks good and feels good) But the Pelican hooks are much more expensive and all the related studs, swaging and shackles really add up both in cost and length.
 |
| The really costly fittings and shop work are where the cable connects to the hook, and large 3/8 size cable exacerbates work and cost. |
So what the picture shows is a simple loop in the cable held in place with hog rings fashioned from a Stainless steel S hook and then whipped with waxed whipping thread. Knowing that the whipping would soon attract dirt from grimy hands I considered wrapping it with boot tape, rescue tape, plastic tape, masking tape. I settled on two layers of heat shrink tubing (three layers over the hog rings) I needed to special order 3/4" heat shrink because white is not a very popular color at the local auto parts store. For some reason most people prefer red and black for battery cables. After final assembly on boat I sat on lifeline and bounced my 230 pounds trying to tear something apart, end of testing.
 |
| I experimented with Starboard creating pad eye anchors at different angles |
 |
| Starboard scraps from other projects are easily worked with standard tools. |
 |
| The beginnings of a mickey mouse jig set up (Forstner bits are the way to go) |
 |
Even with the clamps this is still a freehand operation and takes some experimenting to get the angled hole in the middle.In my opinion using Starboard for this application is okay but creates some misgivings worth noting.
|
Poor mans transponder installation:
OK, if you have to mount a transponder your not poor, a real poor mans transponder would be a lead line hanging from a bent nail ready for a quick sounding.
A long time ago before computers I read on a forum that you could temporarily attach your shoot through the hull transponder with toilet bowl wax. The idea was, being wax you could re-position it, so you could experiment and find a suitable location.
Sounds good, deal me in, but I insist on new wax. I have used wax on four installations, and have had perfect results every time. Did I say temporary, oops. When it came time to permanently install the transducers, I have never found the time. Why mess with what works. On my first install I used my hands to knead the wax into a ball and just pushed it into place. (what a mess on my hands, but it worked fine)
On my last install I gave some thought to make the job less messy, and here are some hints.
- buy the cheapest wax ring you can get for about .99 cents
- Pry or scoop with a Popsicle stick all the wax into a disposable plastic cup for hot coffee (not Styrofoam it will break up on you)
- place it in your oven on very low (170 or less) after awhile it will melt and level out. (you want the wax to be free of air bubbles since air affects transponder readings. This is why you can't shoot through foam cored hulls with good results.
- let the wax cool back to room temp (overnight works for me)
- Clean your solid (not cored) fiberglass hull and warm it up with a light bulb or hair dryer.
- Now take your plastic cup with the wax in the bottom and cut off the flat bottom, place the cup upside down on the heated fiberglass and using the cutoff bottom to keep your fingers clean shove the wax plug out and onto the warm surface. The wax will slightly melt creating a nice air free contact. Throw away the cup and don't worry about getting every last bit of wax, you probably have twice what you need anyway.
- Now the easy part, shove the transponder straight down into the wax plug until it is really in there and is touching or close to the hull. Your directions should tell you to keep it level and which way is forward.
- Your done, wire that baby up and go boating.
- The purist will make a dam or mold out of pvc pipe and fill it with expensive permanent epoxy.
- BTW, if you want to change transponders or take it with you when you sell the boat, the wax never gets hard.
- NO, I did not suggest you stick wax on your transom, that's what duct tape is for.
- If you want you can just ball up that wax in the palm of your hand trying not to create air bubbles, and then jam it and the transponder against the hull. Now spend the next thirty minutes figuring out what cleans your hands. That was my first method and it works fine. (try kerosene)
 |
| Do-it-your-self transponder install kit $1.49 |
 |
| Wax after sitting in oven on very, very low for some hours. (nice teak work bench) |
 |
| Finished job with transponder pushed into wax. I cleaned hull with lacquer thinner but probably didn't need to. The wax is really sticky. |
 |
| Trying to for once in my life to keep my fingers clean I sliced off the bottom and shoved the wax out. You can see where the warmed hull has slightly melted the wax creating a nice (air) bubble free connection. My trial sea run produced perfect results. $1.49 and its reusable! |
Turning dropboards into a door
I've seen this done a few times, and after making this great modification myself I am surprised more haven't done it.Lets face it, drop boards are a pain in the neck. At home we close the door, why not on the boat.
 |
| This is oak plywood and oak trim. The entire unit drops into the slots for the drop boards. One screw on each side keeps it from lifting out. Remove the two screws and the drop boards may be put back in place. |
 |
| This picture is a little blurry but you can see the four ss hinges and two knife latches made out of Starboard. The port opens and was purchased online for about $85 The eye hook secures the hatch. The cabin wall tilts so gravity holds it open against the wall. You would think that boat motion would cause it to swing and bang but it was never an issue. This boat was a Cat 28 that our family spent a lot of time on. I would do the mod again in a heartbeat. |
$28 bimini top
OK, I'm stretching it a little, but we had all the Sunbrella left over from a boom tent that we salvaged from an old boat we sold, so it was free, kinda.
One day I was admiring a camping tent rain fly and it hit me "why can't I fly a rain fly over my cockpit and leave out the tent?" So later on I took a few minutes to dig out an old dome tent with those flimsy fiberglass poles and instantly had a bimini flying over me. Now all I had to do was figure out how to get it to stay up there and not look like some dome tent gone wild or a covered wagon.Pictures are on the way.
Ships Bell
I'm working on reusing an old door bell chime. One of the big old ones with four long brass tubes. So far I've cut one tube down to about 16 inches. Now I looking for a way to hang it outside on the pilothouse wall. I need a way to keep it from swinging (clanging) and then I need a mallet to whack it with. More later.
Follow up: Linda complains, the sound annoys her I guess, it's gone. I'm thinking of getting an ooga horn now, well see how that works out!
No more broken light bulbs
No more broken trouble-light bulbs is what I really mean.
If you are like me you bang your worklight and then blink it's lights out. I switched to LED bulbs, not only are they tough as nails, they don't get very hot and draw such little power I can run them off my little plug in inverter
 |
| $4 bucks and worth every penny |
Leaks and more leaks
For the last three rainy months my boat is on the trailer in the driveway and I've been applying Cap't Tolleys Creeping Crack Cure
to my myriad of suspected roof and window leaks. So far I've been mostly successful but some are still leaking. I think its a good product, but I will never win, its a boat after all.
My new Suzuki kicker
Right out of the box my new motor wouldn't run. The internet dealer said is was the Gasahol fuel here in Oregon. Baloney, no one else has problems with new motors and E-15. It turns out my lawn mower gas was bad and wouldn't run the mower either without a shot of ether and even then it would quit. I got some fresh gas and the Suzuki now purrs like it should. Linda and I ran the dinghy around Ross Island on Memorial day and we used over a cup of fuel in one hour. It only holds 1.5 liters so I will be bringing a two gallon jug with us to the San Juans next month. I also installed a much needed tiller extension and bungee cord to hold the dagger board down.
Follow up: This thing runs great and has a lot of power, but I think the on-board tank is a little small, even though it's bigger than the competition, it seems to always be empty, to the point I'm carrying a jug of gas with me.
Follow up: Not done yet, but I will do it for sure after the last pain in the neck attempt to check level with a flashlight.
All finished and well worth it too. All I did was cut the half inch plastic line below the bottom of my water tank and insert a barbed tee. I ran a clear line mostly upward until it was above the top of the tank. Now water rises up in the tube and registers the tanks level. I added a $1.50 irrigation vent valve to the end of the new standpipe that I open to let the air out when checking the level. No more flashlights behind the tank, no more rocking the boat. I shoulda done this long ago.
Ozone generator
My new Suzuki kicker
Right out of the box my new motor wouldn't run. The internet dealer said is was the Gasahol fuel here in Oregon. Baloney, no one else has problems with new motors and E-15. It turns out my lawn mower gas was bad and wouldn't run the mower either without a shot of ether and even then it would quit. I got some fresh gas and the Suzuki now purrs like it should. Linda and I ran the dinghy around Ross Island on Memorial day and we used over a cup of fuel in one hour. It only holds 1.5 liters so I will be bringing a two gallon jug with us to the San Juans next month. I also installed a much needed tiller extension and bungee cord to hold the dagger board down.
Follow up: This thing runs great and has a lot of power, but I think the on-board tank is a little small, even though it's bigger than the competition, it seems to always be empty, to the point I'm carrying a jug of gas with me.
Sight glass water tank gauge
We ran out of water, so I'm installing a piece of clear plastic tube to judge if we have any water in the tank. Should cost nothing and only take about 30 minutes. More to come on this.Follow up: Not done yet, but I will do it for sure after the last pain in the neck attempt to check level with a flashlight.
All finished and well worth it too. All I did was cut the half inch plastic line below the bottom of my water tank and insert a barbed tee. I ran a clear line mostly upward until it was above the top of the tank. Now water rises up in the tube and registers the tanks level. I added a $1.50 irrigation vent valve to the end of the new standpipe that I open to let the air out when checking the level. No more flashlights behind the tank, no more rocking the boat. I shoulda done this long ago.
Ozone generator
I just ran my ozone machine for a few days inside the boat, the box says kills mold bacteria and mildew and the stinky smells too. Sounds good.
When I went out there today my asthma attacked immediately so I got out of there. I got online to read about the health hazards and there are plenty to worry about. I know the machine works because it nipped the burnt smell out of my burned Catalina, but what I read online today says it just wrecked my sense of smell and didn't kill the burnt smell like I thought. In two weeks I'm moving the boat to its summer home in LaConner and will be sleeping on it. I should have a good idea what Linda thinks of the smells. (none I hope) When we get back after the fourth I'll have some news about whether the ozone machine works, that is if I remember to follow up here.
Follow up: so far so good 8/8/13
Trailer bearings
If you follow this site you know I from time to time put my old flatbed utility trailer to work. Now my utility trailer is not typical, it has 8,000 lb axles and a tilt bed, all wrapped up with six inch steel channel and 2 x 12 decking.
Follow up: so far so good 8/8/13
Trailer bearings
If you follow this site you know I from time to time put my old flatbed utility trailer to work. Now my utility trailer is not typical, it has 8,000 lb axles and a tilt bed, all wrapped up with six inch steel channel and 2 x 12 decking.
I sometimes describe this trailer as, "the best tool I own" It was instrumental in the Bombay Project Bombay Project as well as bringing my Catalina from southern Texas to northern Washington.
OK, here's the problem, its not a boat trailer and I should not be dunking it in the water, but I did, and then my capitol crime was to not dry it off and repack the bearings. Instead I drove it a short ways and parked it for the winter. Now the results. I recently was alerted to a grumbling noise while hauling my tractor and so immediately disassembled the noisy offending hub to discover the bearing was dry and the grease was hard and the roller cages were all rusty. Interestingly (at least to me) the brakes, backing plate, spindle and all that stuff was not rusty at all, probably from all the road grime and brake dust. I pulled apart the other three wheels and found all of them in sad shape. My conclusion is that:


 In the above picture you can see how I extended the mast with two starboard clamps and a piece of 5/8 aluminum rod I salvaged. The sail is attached with pieces of 1/4 in braided poly rope and two bungee balls. I melted holes through the sail at each batten with a hot nail clamped in a vise grip.


Oh by the way, she sails with two or us, although not very perky.
OK, time for an update (9/29/15) For anyone following my lead converting a Livingston - My original (in the photos) placement of the dagger board created way too much weather helm, I moved the dagger board aft 8" and improved performance a lot. I may move it further yet, I think anyone planning on doing this should figure out a way to make it adjustable. (at least until you prove you got it right) another method would be to create a swing lee board which is adjustable by nature, or a clamp on device. Note: the board placement (fore or aft) is a big deal and will make or break your conversion success. More notes: My initial plan was to make do with misc junk, rigging hardware, cleats, blocks, etc.until I knew for sure what worked. My experience has been that you can carry that (make do attitude) idea too far greatly influencing sea trial mishaps. I've proved what works, so now I am upgrading hardware and tweaking things to make sailing the dinghy less a battle of wits and tangled lines, and more actual sailing. For instance I am making the boom longer and adding an out-haul, yes I tried going boom-less and lost substantial pointing ability, for this sail rig a boom is a must. I'm also getting rid of all the biners for snap shackles. Some cleats will become jammers. All in all the conversion is working and I'm glad I did it. My one major worry so far is that the mast may break, I have no idea how much bend it can take, I don't want to learn the hard way.
One last thought. My nine foot boat with this rig is easily overpowered. I vividly remember hanging over the transom trying to keep the bow from going under while sailing downwind in some gusts. Of course an over-sized tall rig is what sails best in light winds, the solution is to reef early, let the sheet go, or go in. I chose to let her rip. In my Hobie Cat days, I flipped quite a bit, this Livingston is no Hobie, and she wont float with the motor on the back, a sobering thought for sure!
I think I may have mislabeled this project because even though it was cheap, it turned out really practical and now that I have used it for a season, I realize I would willingly spend some real boat dollars for the same thing over again.


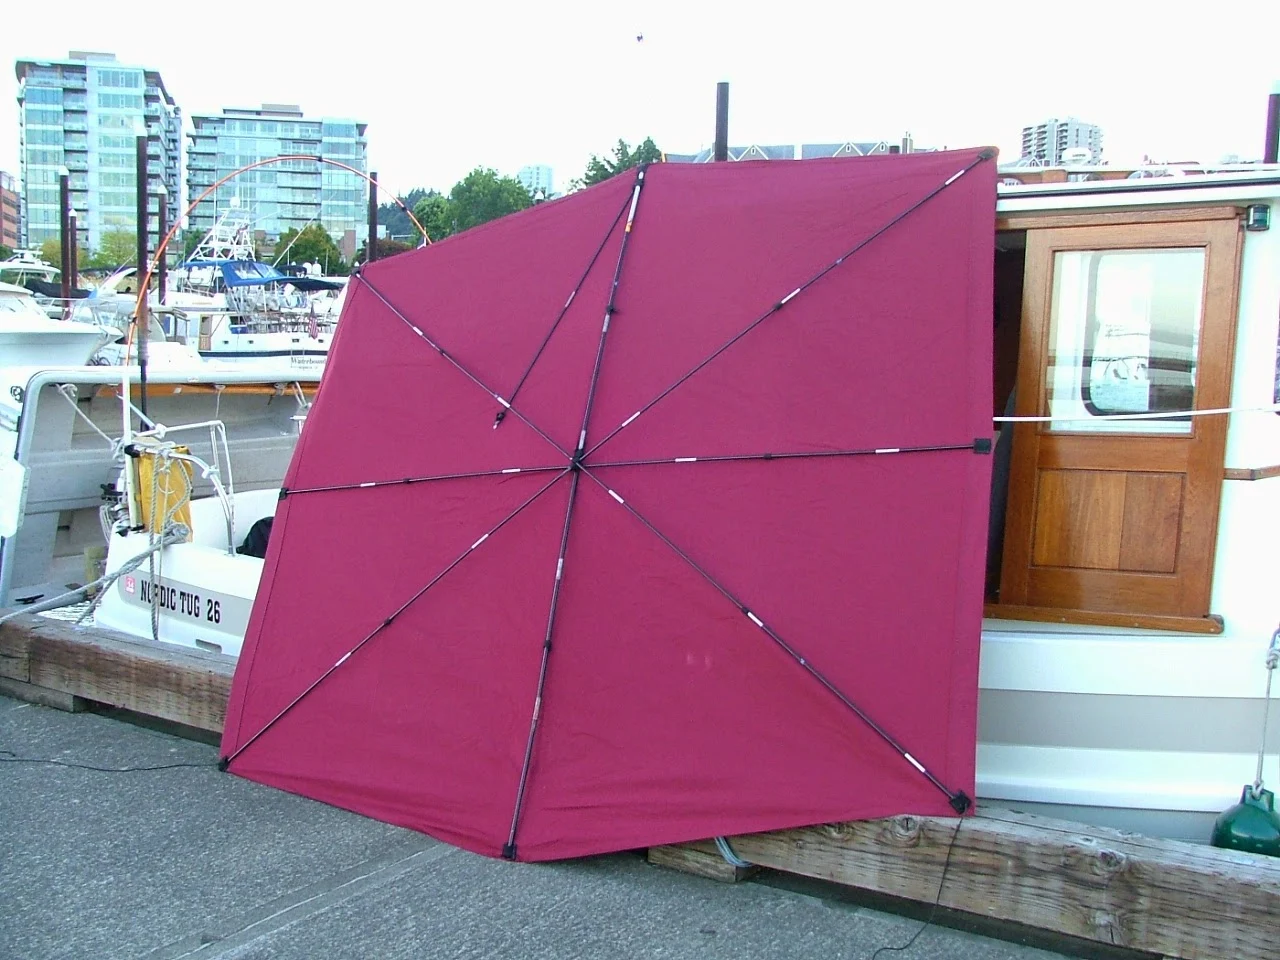
You're looking at a piece of white pvc water pipe, strapped to a stanchion with a couple long pieces of velcro. If you look close you will see a screw that limits how far the tent pole slides into the pvc. The pvc serves two purposes, 1st as a socket, but 2nd, it keeps the tent poles straight until high above the railing before they bend over into a hoop.
 Luckily my stanchions were well placed for this project, without them I may have resorted to attaching a bracket or a standoff from the cabin roof
Next I sewed pole pockets onto the four corners of my Sunbrella, (I used bits of 2" webbing) plus I sewed pockets at the midpoint along each of the four edges. That means eight pockets, for four poles. I had to re-cut and retie the poles so they were about an inch longer than the pockets. The poles must be bowed to be inserted, so I sewed little velcro tabs along the way to keep them straight.

When all four poles are in place, the Sunbrella stretches out like an umbrella with a slight curve and no wrinkles My piece of Sunbrella was a rectangle, but all the poles crossed at the same place right in the middle, so I sewed some long velcro straps dead center and lashed all the tent poles in a bundle.
If your following my description, I now have one super light weight umbrella like top about 9 x 9 feet, but it is not attached to the boat yet.
At this point you could follow what I did or create (invent) your own attachment system. For instance, if you all ready have a dodger or an arch you may want to forgo the covered wagon hoops and utilize you existing hardware. If you have an interfering back-stay, simply slit your top and create a velcro closure. Or if your lucky and have an adjustable stay you may be able to release tension, pull a pin and poke the cable through a reinforced hole you make in the new top.
For me, I used the two hoops spanning the cockpit poked into pvc pipes tied to my stanchions (I used acetone to wash off the plumbing ink ) Next I attached the flat (gently bowed) top to the curved covered wagon hoops with even more velcro straps. To keep the whole thing in place, and resist wind uplift, I tied a small nylon cord to each of the four corners and brought a line down to my lifelines. Tensioning these cords lightly gave the top a slight bow which increased rigidity keeping it wrinkle free. Lastly I tied a mid point line at the front to keep the bimini from blowing backwards when under way at ten knots.
Setting up or taking down in a breeze is a challenge as anyone that has ever had an umbrella pop inside out will recognize, a second person is handy but not a requirement. This bimini system thanks to the folding tent poles, knocks down and may be stored in a stuff sack small enough to stow just about anywhere, it takes about twenty minutes to put up and less than five to take down.
After my initial prototype was constructed, I discovered that some of the old tent poles I was recycling were cracked and too thin to really work well, so I went to Walmart and bought some Coleman replacement poles that were much stiffer. The Coleman poles came in kit form (four sections for $7.99) My job required six and a half sections per pole to stretch the Sunbrella tight. When researching bungee poles I discovered they come in about five diameters from way too thin 3 or 4 mm up to hefty 8mm The Coleman replacement poles were perfect.
In actual use, my Bimini looks good and cost very little. (the fabric was the biggest cost and luckily for me was left over from another project) I'm very happy with the outcome. While underway or in 10-15 knots the flexible poles allow the top to give with increasing pressure, the five lines control the amount of flexing and uplift. I have not had any indication that the poles will break or that the design is flawed.
One thing you can not do with this system is use it for a handhold, it may look solid, but it is just a tent.
When getting it right the first time is the only option!!
If you try to muscle your way through this situation without first thinking out each step, well I don't want to even ....
My helper straddled the opening and using good body mechanics lifted with both hands (120 lbs) while I crouched on forward steps and carefully guided battery.

There are any number of ways to make this carrier from left over stuff. I would even consider plywood if the weight and clearance weren't such an issue. My only concern was that the 5/16 bolt might break, ouch! I was also paying close attention to the posts. 1200 amps will certainly get your attention. (When I used this tool for my next battery, I upgraded to a 3/8" bolt, if I had a grade 5 or 8, I would have used it.)
You can destroy your day tweaking (ruining) a little part when sometimes all you need is a little heat to get your way.
The standard propane torch will heat up many things just enough to make a good day out of a bad day.
So why do I have to break something first, to remind me to apply some heat? The reason is because sometimes I get away with it.
Heating cheap parts sometimes takes off the cheap finish, ****
Cheap cast parts break anyway.
So pull out the torch!
What's in YOUR Galley
This isn't really a do-it-yourself post, more like a product review.

I have no defense except to say I acquired the boat for its crispy almost new sails, not its bench seats.
 I picked at the chips with my finger and they broke off, but some are attached well. Linda said peel the entire seat. I said hold on, let's not turn this into a mega project and still end up with an ugly boat.
 The pics show the worst of it, but the entire boat is crazed and cracked at stress and flex points.
My solutions are almost always inexpensive and keeping the big picture in mind. The big picture is that the boat is a 39 year old Cat 22 with its best days long gone, and I wanted to go sailing. I researched online and found several thick paint products ($50 - $75 qt plus shipping) that the manufacturer claimed would bridge small gaps. I'm not willing to spend fifty bucks to be disappointed.

This shot in direct sunshine shows the well encapsulated cracked gel coat is all but invisible. If I were inclined (and I'm not) I would sand the heck out of it before the finish coats and get rid of the slightly mottled look.
Cut off that table
My answer for many boats has been to cut the table smaller into something appropriately sized for the space and usage. Plus I have learned to use a single post and mount the round socket tabletop fitting near one end. The offset mounting facilitates rotating or swinging the table out of the way. My last table butchering began after first laying out four dinner plates, four hands of cards, dominoes, and my laptop. (not all at once) I then proceeded to whack and rebuild the original, adding short little fiddle edges to keep crumbs and things from rolling over the edge. (hint: leave an opening in the fiddles to clean up said crumbs.) I also decided it only needed to hold two plates, two coffee's, one ketchup.
Of course you can make an entirely new table, store your big table under the bed and bring it out for company or when you sell the boat.
LED trouble light
This is a great suggestion, I can't believe how easy it was to solve an annoying problem.
I have always banged my corded trouble lights against car fenders, basement joists and boat framing in the bilges -- you know the drill -- and then the light goes bright just before blinking out. This is such a common occurance for me that I start my projects with a new package of four bulbs and finish with only one in the light if I'm lucky. I'm also lucky if I don't burn my arm several times too.
I switched to an expensive led (60W equivalent) and I'm still on my first one I even use my trouble light for an extension cord and haven't broken the led yet.
Great suggestion -- high five me!
Salt water corrosion warning and TIP!
Once in while we all learn something new, but sometimes we let slip what we already know or fail to connect the dots and get caught suffering the consequences.
Case in point - We were out of town on the interstate and got a flat tire on our pickup, the same one I use to haul my boats and toys. Flats are no big deal, I carry all the tools and have a spare. After jacking up the rear wheel and removing the eight lug nuts I was unable to get the wheel loose. I spent over an hour beside 75 mph traffic trying to break it loose. I even constructed a makeshift hammer using a chain and my spare for a weight, all to no avail. Eventually I called AAA and the tow truck driver used a six foot pry bar to break it free.
The problem was galvanic corrosion (like rust on steroids) between my alloy wheel and the steel hub. Brought on, I assume by dunking in salt water during boat launches. You may think it had been many years since the wheels were off and that's why they were rusted. NOT TRUE! I bought new tires the year before. The problem developed in a short period of time.
When I got home I checked the other side and sure enough it was frozen and required a large pry bar also. The front ones were fine, of course the front ones never get dunked.
I wire brushed everything and slathered on a coat of bearing grease vowing to pull my rear wheels as part of my regular maintenance in the future. In the past, I have always cleaned and greased the trailer lugs and pulled the bearings, but I've done everything without separating the wheel and hub, now I know better, ditto the truck.
Just my experience I thought I would share and maybe save someone a headache.
WATERWELD 7/16/17
Propane range install
I have a diesel stove, complete with day tank and chimney if anyone wants to tackle the soot issue, but I am done.
While disassembling things I realized I was very lucky, my problem was much more severe than I suspected, worse yet it was quite obvious. I totally blew it and now am paying the price missing my planned trip to Victoria. Oh sure, I can make the trip later on but I had to give up my hard earned ( paid for ) dock reservations for Canada Day.
The story is far from over, so far I have replaced one axle and spring set and got the trailer working again, the other axle will wait until this winter during Christmas Ships parade time. I know, intentionally waiting for it to be cold, dark and wet makes no sense.
A week later my diesel heater kit arrives. I was very nervous and suspicious, the instructions were pretty much useless and the contact e-mails were not answered, however with some u-tube help and experimenting I got it working.
Due to my product mistrust and not wanting to really tear apart the boat I opted to build a suitcase heater (my words). I took all the components, including the fuel tank that came in the kit and assembled them compactly into a cube about 16 x 16 x 16 inches. I tied my heater on the back roof and ran a four inch dryer hose through a port hole three feet away. I ran a 12V power cord (using a flat trailer light plug for disconnect) into the engine vent directly to one of my big batteries using the inline fuse in the kit. Inside the cabin at the porthole I modified a flat dryer vent quick connect and directed the air flow downward.
I sewed a sleeve out of old sail cloth to protect and disguise the flimsy aluminum dryer hose.
That's it, install complete, it takes about two minutes to remove or install my suitcase heater.
Performance
After some u-tube sleuthing, I figured out how the controls work and fired it up. It has about ten heat settings. On low the heater sends out a stream of hot air that is substantial and so hot you may not touch the metal duct I used inside the cabin. On high it is an absolute blast that you can feel across the cabin and you can't hold your hand in the air stream for more than a few seconds. This heater cranks out the btu's, I'm guessing 15,000 or more btu's and 500 CFM on high. It out performs the electric heater, the propane stove and my Mr big buddy all combined and then some. There is no smell inside, outside is a one inch very hot exhaust that doesn't smoke once it cranks up.. It does make a muffled roar that sounds a little like a jet turbine. I am kinda glad it's not in the bilge somewhere as I originally planned. So far I'm super impressed.
Follow up: I have run it through an entire fuel tank over a period of a couple weeks and it has performed flawlessly. Most of the time we started out on high but quickly reduced the setting to low after ten minutes. It really has made the boat a wet/cold weather oasis under way or at the dock.
- boat trailer bearing grease should be waterproof, just like we all know to use
- if its not, you should tend to your bearings right after dumping your utility trailer in the water, and not wait until they grumble.
I did know better, that's the worst part. (I suppose the lights are corroded too)
Sailing Dinghy
The dinghy is on Weaver snap davits and when lowered into water it's a simple matter to transfer the 29-pound motor to the dinghy and back while the davits hold everything steady


So the good idea is to get a motor mount, dinghy, kicker, and swim step that all fit together.
The dinghy has a dagger board slot, rudder gudgeons and easy flip up wheel brackets, which make it a very little 9 foot sailboat on wheels hanging off the back. The only problem is that the rudder and motor can't both be on the dinghy transom at the same time. A problem I'm still working on.
BTW these little kickers are easy to steal. I removed the cowling and wrote my name on the white gas tank. I also engraved my drivers license number on the lower unit. I read where one skipper spray painted his brand new motor to make it less attractive and easily identifiable.
Important follow up on Sailing Dinghy: After spending the season with the new sailing dinghy, I am throwing in the towel and going back to my Livingston, or maybe get an inflatable for our shore boat.
Here is the rub. The qualities that make a great shore boat hurt sailing ability, and great sailing characteristics aren't necessarily desirable or help feeble older people climb in and out.
The #1 problem is the lack of initial stability makes it an accident waiting to happen when boarding off the swim step or beaching,
(just ask my son how he managed to get so thoroughly soaked beaching by himself) The #2 problem is when towed, water comes up the dagger board well and swamped the dinghy forcing us to stop and bail. Yes I had the plug in, but it leaked (the swamping problem may be unique to this particular boat) because I pulled it too fast.
The rest of the story is this, we use the dinghy for a shore boat 95+% of the time, sailing very little. So it make sense that the dinghy should be an excellent shore boat first and foremost, and never ever dump oneself in the brine. Even if one deserves it, or had it coming. The sailing dinghy had to go.
Trailer tires and UV rays
I had a perfectly good looking trailer tire self destruct while sitting unused on a travel trailer. After seven years it simply split open due to UV rays according to the tire store. I went right out and covered the rest with plastic garbage bags, here's hoping I'm not too late.
Night lights
I bought two of those cheap led yard lights with a battery and solar charger. One blew apart in the wind and fell over board, but before it sank it had already proved itself. The other one (a different design) I tied up on the roof in an impromptu anchor light kind of way. When paddling back in the dinghy its low power glow guides and welcomes us back when it's dark. I think everyone should get a couple, only make sure they can handle a little wind. At five bucks or less you can buy new ones every year.
Not last time, last time for me, several things came together with disastrous results. #1 I was rushed at a busy public ramp and so wasn't thinking. #2 I had a tightly wound drum cable plus I winched way too tight, so there was no stretch left. #3 I was using an extra steep ramp so the pivoting was extreme.
Part way up the ramp when the boat was just laying down on the bunks a huge bang and jolt shook my world. I stopped and sure enough my 1/4" cable had broken, my bow winch stand was creased, some welds were tearing, and worst of all my 1/2" bow u-bolt was pulled a quarter to half inch out. Externally the fiberglass looks good, but inside the anchor compartment you can see where the 1/2 nuts are slightly depressed and the entire area may be a little concave.
Luci lights
You need to get some of these solar lights, I received a couple as a present and love-em.
I think you will too. We use them for our interior lights while we play cards and dominoes. Just google luci light. They blow up like a beach ball and can be deflated for backpacking. You can probably get them at places like REI.
Don't do what I did
dumb dumb dumb dumb
This is a trailer boat retrieving problem that occurs with bunk trailers. First I must describe a retrieval so that we are on same page.
The trailer is submerged and you float the boat all the way up to the hitching post. (that's the bumper with the rubber v-block and a winch or hook). Next you winch her in tight and your ready to begin pulling your prized possession out of the drink. Remember your boat is attached at the front, but the aft is still floating two feet +- above the rear bunks. As you pull out of the water your trailer comes up or your boat goes down (same thing) until shes sitting flat on all the bunks. During this settling down period your boat is pivoting like a hinge on the front bunk where she first touched. The pivoting process causes your boats bow eye to move up and way from the rubber chock a few inches. This is why your boat always seems like it moved aft after you get the rig up on the level. The problem is that as the boat settles down you are putting a massive strain on #1 your winch stand, #2 your winch and cable, #3 your bow eye.
We all get away with this because the cable or strap has some flex and gives a little, or the boat is light enough that it skids/slides forward a little.
Not last time, last time for me, several things came together with disastrous results. #1 I was rushed at a busy public ramp and so wasn't thinking. #2 I had a tightly wound drum cable plus I winched way too tight, so there was no stretch left. #3 I was using an extra steep ramp so the pivoting was extreme.
Part way up the ramp when the boat was just laying down on the bunks a huge bang and jolt shook my world. I stopped and sure enough my 1/4" cable had broken, my bow winch stand was creased, some welds were tearing, and worst of all my 1/2" bow u-bolt was pulled a quarter to half inch out. Externally the fiberglass looks good, but inside the anchor compartment you can see where the 1/2 nuts are slightly depressed and the entire area may be a little concave.
And if that's not enough, the broken cable is pulled down inside the warps on the drum, and I may damage a wrap just getting it loose again.
1/4 ss cable breaks at about 6400 lbs, I guess its a good thing I used an old 1/4 inch Catalina keel lifting cable I had saved instead of a new piece of 3/8 which would have double the breaking strength.
<There used to be a picture here>
All this could have been avoided if I would have stopped after pulling a few feet up the ramp, and released the winch tension, (rollers at the front would help also) BTW, an all roller trailer may be the choice of some but most of us play the hand were dealt and don't have the funds to dream up and create the perfect rig. (I lost a boat once when the bow eye broke and the boat rolled off the all roller trailer at a stop sign. (I know I know, where were my tie downs?)
Meanwhile, as I was driving down the road still sore at myself for making such a stupid mistake I kept thinking I need a checklist. A checklist with all those little things that can ruin a trip if overlooked. Transom plug, check - Sea-cocks, check- battery switch, bilge blower, lower the antenna's (omg) crap, stow the anchor, fenders, fresh water rinse and on and on.
The list could be really big, but when certain things come together, break out another thousand.
Boat Acronyms
Here's some more I looked up, but I'm still not laughing.
BOAT Bankruptcy on a Trailer
BOAT Base-station Over the Air Testing (Agilent Technologies Inc.)
BOAT Based on a True Story (Yo Gotti album)
BOAT Best of All Time
BOAT Blow Out Another Thousand (boating slang)
BOAT Boat Operator Accredited Training (Lifesaving Society, Canada)
BOAT Break Out Another Thousand (boating slang)
BOAT Bring Over Another Thousand (boating slang)
BOAT Building Officials Association of Texas (Austin, TX)
BOAT Buoyancy Operated Aquatic Transport (Phineas and Ferb; TV show)
BOAT Bust Out Another Thousand (boating)
BOAT Byway Open to All Traffic (UK)
Leaking Windows
I bought a bottle, from West Marine, of Capt'n Tolleys Creeping Crack Cure. My four window leaks are down to one, but that one is driving me nuts. I think the product is good and does what they say. My problem is I refuse to follow directions or I read what I want to hear, instead of what they say
My Antenna is gone
It's snapped off at the base, leaving a jagged splintered fiberglass stub two inches long. I have no idea what, when, where, nada. The good news is the radio still works.
Livingston Dinghy Sailing Conversion
My 9 foot Livingston being a catamaran is very stable, and that alone put it way ahead of our recently disposed of sailing dinghy. To make a sailboat out of a dinghy I needed:
- A mast step
- A rudder
- A dagger board
My mast and sail came from an old sailboard set up, so basically all I needed was a socket to poke the fiberglass pole into. This is what I came up with
 In the picture you can see four chains with turnbuckles. (ok, one chain is hidden) My first generation prototype had lighter chain, lighter turnbuckles and only one on each side. My first one pulled apart and everything went over the side. All the padeyes are through bolted with starboard backing on both sides. The plywood box is strapped at the top to keep it from being pulled apart. I feared the hollow 16 foot mast would break so I sleeved it for twenty four inches with a snug fitting piece of 1.5 pvc pipe. The mast ends are filled with foam so it will float.


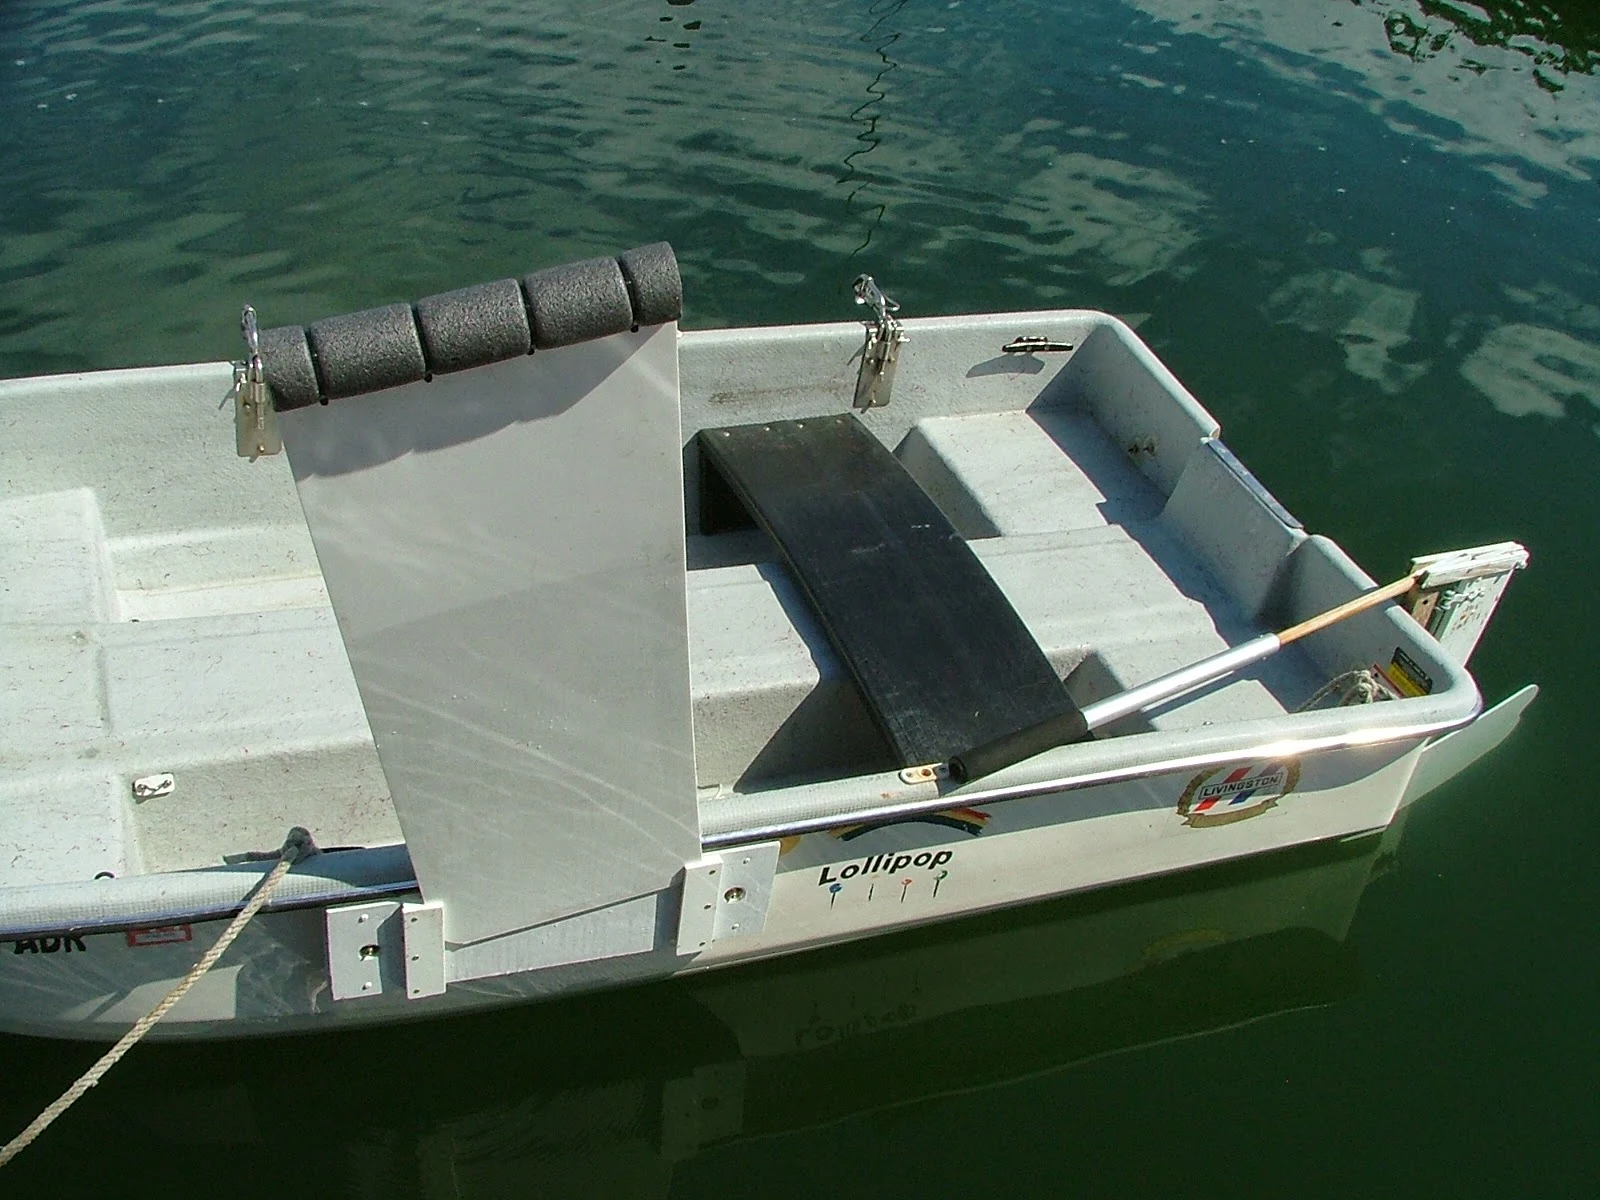
In this picture the step is not installed, you can see that the dagger board and rudder are on one side only. I did this one sided mounting so that I could keep the Honda kicker in the transom center. As it turns out having the dagger and the rudder in line is a good thing. She sails fine, turns on a dime and surprisingly does not favor port or starboard. The daggerboard guides are simply some starboard pieces shimmed and through bolted on a piece of plywood. The plywood has a matching back board on the inside and uses only two bolts to attach the whole thing. Notice that the rudder extends back about twenty four inches and has a kick up pivot pin above the water for beaching. I chose this set up so that I could scull the rudder to propel the boat. A deeper more efficient rudder will not scull at all. Speaking of performance, sailing without the heavy motor greatly improves performance, but she works OK with the motor and with two people and that is all that matters.

You can see how the dagger simply slides up and down. Starboard floats, but is almost neutral so I attached a piece of foam with cables ties to make a handle and add buoyancy. The daggerboard is 14 inches by 38 inches and is 1/4 inch thick, the rudder is the same thickness. After using the boat I believe that 3/8 or 1/2 inch board would have been better, but costly and heavy. Sailing in stiff breezes flexes the board sideways, but that may be a good thing because allowing leeway reduces the load. However, I was unhappy with the excessive leeway so I attached a piece of oak - 3/8" by 2" by 30" to stiffen the dagger board. I shaped the oak to improve hydrodynamics and screwed it to the middle of the dagger board. The stiffer board greatly improved up wind performance. She will not go upwind with the board up or out, so don't bother skipping building one. The black plastic bench seat slides fore and aft in the dinghy foot wells. Notice the telescoping tiller too.


The boom is a 1 inch aluminum tube with a wood yoke. A piece of velcro holds it against the mast.

A couple of biners and a snap shackle completes the sheet and thats it.

This is at False Creek in Vancouver BC
I added reef points at the second batten which reduces the sail area by more than 50%. The sail may be raised, furled or reefed, and the mast may be stepped or unstepped by myself out on the water.
I had to buy the starboard but my choice for all the other materials was dependent upon what I had on hand. There are many other ways to accomplish the same thing and certainly with greater glitter, but what I did works well. She sails upwind and comes about easily when tacking My basic desire was to make my Livingston a safe sailing dinghy without giving up my outboard or my oars, but I find myself leaving the outboard on the mother ship, and the only thing I use the oars for are fending off wayward boats and docks. (once again don't ask)
Oh by the way, she sails with two or us, although not very perky.
One last thought. My nine foot boat with this rig is easily overpowered. I vividly remember hanging over the transom trying to keep the bow from going under while sailing downwind in some gusts. Of course an over-sized tall rig is what sails best in light winds, the solution is to reef early, let the sheet go, or go in. I chose to let her rip. In my Hobie Cat days, I flipped quite a bit, this Livingston is no Hobie, and she wont float with the motor on the back, a sobering thought for sure!
Bimini Top on the cheap
I think I may have mislabeled this project because even though it was cheap, it turned out really practical and now that I have used it for a season, I realize I would willingly spend some real boat dollars for the same thing over again.

I started with the premise that I could use fiberglass tent poles to hold up and support, a 9 x 9 piece of Sunbrella. (the same bungee corded poles found in all the domed camping tents.
I happened to have a bunch of saved poles from tents tossed out years ago. The first thing I did was form two hoops across the boat, like a covered wagon, one hoop in front of the hatch the other at the back of the cockpit. Initially I duct taped the hoops in place to get a feel for the look and feasibility.


Everything fits neatly

If not for the bungee corded poles this would be a mess, but they all come together into 6 poles
My cockpit is about nine feet across so the tent poles easily bent into a hoop above my head.
To secure the hoops, I attached to my stanchions, (my stanchions just happened to be well located for this project) two foot long pieces of white pvc pipe, I used long velcro straps and wrapped the heck around the pvc and stanchion, I also secured the velcro to the pvc with metal screws and heavy white duct tape. then I simply poked the tent rods into the tubes.

You're looking at a piece of white pvc water pipe, strapped to a stanchion with a couple long pieces of velcro. If you look close you will see a screw that limits how far the tent pole slides into the pvc. The pvc serves two purposes, 1st as a socket, but 2nd, it keeps the tent poles straight until high above the railing before they bend over into a hoop.

Next I sewed pole pockets onto the four corners of my Sunbrella, (I used bits of 2" webbing) plus I sewed pockets at the midpoint along each of the four edges. That means eight pockets, for four poles. I had to re-cut and retie the poles so they were about an inch longer than the pockets. The poles must be bowed to be inserted, so I sewed little velcro tabs along the way to keep them straight.


When all four poles are in place, the Sunbrella stretches out like an umbrella with a slight curve and no wrinkles My piece of Sunbrella was a rectangle, but all the poles crossed at the same place right in the middle, so I sewed some long velcro straps dead center and lashed all the tent poles in a bundle.
If your following my description, I now have one super light weight umbrella like top about 9 x 9 feet, but it is not attached to the boat yet.
At this point you could follow what I did or create (invent) your own attachment system. For instance, if you all ready have a dodger or an arch you may want to forgo the covered wagon hoops and utilize you existing hardware. If you have an interfering back-stay, simply slit your top and create a velcro closure. Or if your lucky and have an adjustable stay you may be able to release tension, pull a pin and poke the cable through a reinforced hole you make in the new top.
For me, I used the two hoops spanning the cockpit poked into pvc pipes tied to my stanchions (I used acetone to wash off the plumbing ink ) Next I attached the flat (gently bowed) top to the curved covered wagon hoops with even more velcro straps. To keep the whole thing in place, and resist wind uplift, I tied a small nylon cord to each of the four corners and brought a line down to my lifelines. Tensioning these cords lightly gave the top a slight bow which increased rigidity keeping it wrinkle free. Lastly I tied a mid point line at the front to keep the bimini from blowing backwards when under way at ten knots.
Setting up or taking down in a breeze is a challenge as anyone that has ever had an umbrella pop inside out will recognize, a second person is handy but not a requirement. This bimini system thanks to the folding tent poles, knocks down and may be stored in a stuff sack small enough to stow just about anywhere, it takes about twenty minutes to put up and less than five to take down.
After my initial prototype was constructed, I discovered that some of the old tent poles I was recycling were cracked and too thin to really work well, so I went to Walmart and bought some Coleman replacement poles that were much stiffer. The Coleman poles came in kit form (four sections for $7.99) My job required six and a half sections per pole to stretch the Sunbrella tight. When researching bungee poles I discovered they come in about five diameters from way too thin 3 or 4 mm up to hefty 8mm The Coleman replacement poles were perfect.
In actual use, my Bimini looks good and cost very little. (the fabric was the biggest cost and luckily for me was left over from another project) I'm very happy with the outcome. While underway or in 10-15 knots the flexible poles allow the top to give with increasing pressure, the five lines control the amount of flexing and uplift. I have not had any indication that the poles will break or that the design is flawed.
One thing you can not do with this system is use it for a handhold, it may look solid, but it is just a tent.
As you can see in this picture, because of its umbrella design it sheds water and it is above our heads. It turned the cockpit into an all weather extension of the cabin. We barbecue on the rail rain or shine. When the wind kicks up or at speed, it flexes and then stands back up. Even if you have to buy everything new and hire a sewing machine, I am sure you will be very happy with this inexpensive custom top, I know we are.
FOLLOW UP: We have used our Bimini now for over a year, and fine tuned our method of putting it up and taking it down, (method makes a difference) and I have some news to report. While in a slip the top withstood 40 mph winds, and reported 65 mph gusts with the only problem being some tie down lines pulled through some webbing because the stopper knots were too small. We also had a small bend (not a kink) in one of the aluminum tent poles. Surprisingly none of the fiberglass poles broke. The fixes were simple and fast. My original theory that the top would flex with the wind was correct, but I still wish I could lean on it or use it as a hand hold. Oh well, did I mention it fits in a bag?
YET ANOTHER follow up report: Another winter has caught us with the bimini intentionally left up during our 15 day Christmas Ships Parades.
Going boating in the dark of winter three hours after sunset is a dreary affair to be sure. Adding driving rainstorms while walking the dock and boarding really makes me glad I have the bimini to duck under.
When I arrived the bimini was whipping and one hoop pole was out of its socket and bent, but the bimini was mostly in place. Wind was on our stern, our weakest direction and had been reportedly gusting over fifty again so I was not surprised to find her suffering.
Failures noted: Once again some large stopper knots pulled through their melted webbing attachment holes. This is the second time failure was caused by this dumb technique. My remedy is to quit using stopper knots, set a grommet and tie a real bowline knot, (this is boating 101, I should have known better) Another failure was velcro ties that let loose, causing a cascade of more coming loose. The fix is the same, use line and tie a knot. Velcro has limits! - duh. The last problem noted is that my hand stitching pulled apart at several pole pockets. The answer = use stronger thread, a sewing awl, and learn to tie knots with a needle - duh again.
I totally love the concept and design of this bimini, all it needs is a better builder.
Handy tool solves major headache
 |
Yes, its a piece of curved conduit bolted to a telescoping piece of straight conduitThe problem is - how do I lift a 120 pound 4d battery that is slid under the deck.To make it more difficult, the battery must be tilted and then pivoted to clear expensive parts of motor. |
The solution is - get help - but first build a proper tool
 |
| Now you see the rest of the picture, the battery is up against water pump but still doesn't clear. |
My helper straddled the opening and using good body mechanics lifted with both hands (120 lbs) while I crouched on forward steps and carefully guided battery.
 |
| levitating 4d battery |

There are any number of ways to make this carrier from left over stuff. I would even consider plywood if the weight and clearance weren't such an issue. My only concern was that the 5/16 bolt might break, ouch! I was also paying close attention to the posts. 1200 amps will certainly get your attention. (When I used this tool for my next battery, I upgraded to a 3/8" bolt, if I had a grade 5 or 8, I would have used it.)
Breaking metal versus bending metal
We all know that if you bend expensive metal parts they sometimes break? and the more expensive the part the easier they break.You can destroy your day tweaking (ruining) a little part when sometimes all you need is a little heat to get your way.
The standard propane torch will heat up many things just enough to make a good day out of a bad day.
So why do I have to break something first, to remind me to apply some heat? The reason is because sometimes I get away with it.
Heating cheap parts sometimes takes off the cheap finish, ****
Cheap cast parts break anyway.
So pull out the torch!
What's in YOUR Galley
This isn't really a do-it-yourself post, more like a product review.
 |
| I made this top to cover the dirty sooty top of our Dickinsen diesel stove while its not in use. The benefits should be obvious. |
 |
| I wanted to highlight this great bunch of products. You certainly recognize the camp stove, but you may not have experience with the stove top coffee maker or the oven. This little threesome goes with us boating, and on the road. The convenience and performance of these (3) products makes our trips a real joy. (the oven folds up) I can honestly say I would almost prefer them over a built in propane system. Allll--most! We also use a big griddle that completely covers the cook top. While were on it, Even though our boats and camper have pumped fresh water tanks, we still carry two five gallon plastic jugs with fresher fresh water. |
CRACKED GEL COAT
You have probably seen this on other peoples boats and wondered if the owner was some sort of derelict themselves.

I have no defense except to say I acquired the boat for its crispy almost new sails, not its bench seats.


My solutions are almost always inexpensive and keeping the big picture in mind. The big picture is that the boat is a 39 year old Cat 22 with its best days long gone, and I wanted to go sailing. I researched online and found several thick paint products ($50 - $75 qt plus shipping) that the manufacturer claimed would bridge small gaps. I'm not willing to spend fifty bucks to be disappointed.
 |
First I scrubbed it hard with soap and water, after drying a week in our wet NW weather (under cover) I thinned oil based Rust-oleum and flooded the surface trying to work it under the loose flakes. |
 |
| I used oil based pure white, black, almond and leather brown, a turkey baster and an eye dropper.and lots of little yogurt tubs for mixing bowls until I mixed a color that I liked (almond and brown make tan), but first I thickened just the white with West System silca. The directions say for thickening epoxy, I figured why not paint? At first I used too little silica and put on multiple coats not getting good results, finally I mixed it to a really really thick peanut butter consistency and using a one inch bush spread it around feathering the edges as best I could. I cheated a little where the chips were missing and filled the craters with bondo. Lastly I used a block with 150 grit and knocked the worst of the points off before top coating it with my custom color mixed Rustoleum. |
 |
Masking is important, not to create clean edges, but to tell you to stay in the work area and not wander, making the job bigger. |

This shot in direct sunshine shows the well encapsulated cracked gel coat is all but invisible. If I were inclined (and I'm not) I would sand the heck out of it before the finish coats and get rid of the slightly mottled look.
 |
| I painted both sides the entire length of the cockpit and went sailing after curing for five days. silica cost about $13, Almond Rustoleum $12 ( I already had the rest) and I have lots left over. I think I spent about 8 hours (lots of time mixing colors) spread out over two weeks.  So far, I am a happy camper with the results. I've been sailing off and on for two weeks and the repairs are holding up fine. The color match with the old decks and cockpit sole are close enough that the repair is not noticed. Follow up: We are coming up on a year since making this repair, I can report that none of the crazing or cracks have returned or broken through the repaired areas. |
Cut off that table
Decades ago I got tired of fighting with the big factory installed tables that are designed to drop down and become a double berth. Some marketing guru's probably wanted to advertise "drinks ten, feeds eight and sleeps six." I don't care - my boats only sleep two and none on the kitchen table.
My answer for many boats has been to cut the table smaller into something appropriately sized for the space and usage. Plus I have learned to use a single post and mount the round socket tabletop fitting near one end. The offset mounting facilitates rotating or swinging the table out of the way. My last table butchering began after first laying out four dinner plates, four hands of cards, dominoes, and my laptop. (not all at once) I then proceeded to whack and rebuild the original, adding short little fiddle edges to keep crumbs and things from rolling over the edge. (hint: leave an opening in the fiddles to clean up said crumbs.) I also decided it only needed to hold two plates, two coffee's, one ketchup.
Of course you can make an entirely new table, store your big table under the bed and bring it out for company or when you sell the boat.
 |
| This puny table has no fiddles to interfere with cards - holds a four person rummy game and a glass of wine. The post is at the near end so it may be rotated over the bench seat when serving dinner for two.. |
LED trouble light
This is a great suggestion, I can't believe how easy it was to solve an annoying problem.
I have always banged my corded trouble lights against car fenders, basement joists and boat framing in the bilges -- you know the drill -- and then the light goes bright just before blinking out. This is such a common occurance for me that I start my projects with a new package of four bulbs and finish with only one in the light if I'm lucky. I'm also lucky if I don't burn my arm several times too.
I switched to an expensive led (60W equivalent) and I'm still on my first one I even use my trouble light for an extension cord and haven't broken the led yet.
Great suggestion -- high five me!
Salt water corrosion warning and TIP!
Once in while we all learn something new, but sometimes we let slip what we already know or fail to connect the dots and get caught suffering the consequences.
Case in point - We were out of town on the interstate and got a flat tire on our pickup, the same one I use to haul my boats and toys. Flats are no big deal, I carry all the tools and have a spare. After jacking up the rear wheel and removing the eight lug nuts I was unable to get the wheel loose. I spent over an hour beside 75 mph traffic trying to break it loose. I even constructed a makeshift hammer using a chain and my spare for a weight, all to no avail. Eventually I called AAA and the tow truck driver used a six foot pry bar to break it free.
The problem was galvanic corrosion (like rust on steroids) between my alloy wheel and the steel hub. Brought on, I assume by dunking in salt water during boat launches. You may think it had been many years since the wheels were off and that's why they were rusted. NOT TRUE! I bought new tires the year before. The problem developed in a short period of time.
When I got home I checked the other side and sure enough it was frozen and required a large pry bar also. The front ones were fine, of course the front ones never get dunked.
I wire brushed everything and slathered on a coat of bearing grease vowing to pull my rear wheels as part of my regular maintenance in the future. In the past, I have always cleaned and greased the trailer lugs and pulled the bearings, but I've done everything without separating the wheel and hub, now I know better, ditto the truck.
Just my experience I thought I would share and maybe save someone a headache.
WATERWELD 7/16/17
I haven't posted recently -- it doesn't mean nothing is going on in my do-it-yourself world, it means I've gone boating and nothing needs fixing. Until now.
I remember when I installed it, thinking screws are not the strongest attachment method, through bolting would be better. At the time I could not figure out a way to access what would be buried nuts, I even called the factory and asked their advice. They said they just drive big screws into the top of the fiberglass gunwale.
So now I have to fix a problem I saw coming years ago. Fortunately I have been here before.
The problem is, I have four holes in a rectangle about 2 x 3 inches with #14 screws ripped out, leaving me shredded fiberglass about 1/2" deep.
What I did: I used the screws like a saw and ran them in and out cleaning out loose fiber and old bedding compound. This also tended to enlarge the holes marginally which doesn't matter.
I then mixed up a itty bitty slice of JB Waterweld. Waterweld comes in a putty stick form and is quite stiff, like plumbers putty. It is a two part epoxy, the center of the stick is one part, the outer layer is the other part. You simply cut off the amount you need, mush it together between your fingers until the color is uniform, takes very little effort or time.
Next I rolled it between my fingers into a worm like shape that would slide into my reamed out screw holes. After a few mis-trys I got a good fit. Next I took a small (skinny sheet rock nail) and worked it into my worm filled hole in a circular fashion, pushing the putty into the surrounding glass fibers and void.
Next I took the #14 screw and screwed it into the center being careful to make sure the screw drew down into the mixture as I turned it.
Because there is not enough room for putty and screw in the hole, the excess putty is forced into the fiber and oozes out the top and bottom. I have done this on jobs that are visible, so I know that it happens.
Very important: Next I let it begin to set up which is only 2-3 minutes after mixing. I keep working the screw in and out a few turns so that it does not adhere to the putty. Once the putty takes its initial hardening set, I remove the screw and wait until it is good and hard before setting my base plate in polyurethane and spin the screws into their new custom threads. (I waited overnight this time, but I have done less critical repairs in ten minutes)
This method works well if you do not have access to the bottom side. If possible and time permitted, I would have sealed the back side with tape, and poured epoxy into the area so that it flowed into the damaged fiber, and then drilled and tapped or used a bolt. Pouring epoxy into a bottomless hole makes a real mess inside the boat.
I wrote about JB WELD products in an earlier posting where I was bending SS tube and I had to repair damaged screw holes after drilling out broken screws.
This system has worked very well for me, however I would much prefer through bolting and using backing plates for far superior strength.
Note: JB Weld makes Waterweld and is available all over. JB also makes many of the products you may already be familiar with only under different names.
Lesson to learn: Don't push or pull on stanchions!
On our last outing I was fighting the current and wind, wrestling the boat alongside the county dock at Obstruction Pass when suddenly the stanchion I should not have been shoving on, UPROOTED and folded inward.
I remember when I installed it, thinking screws are not the strongest attachment method, through bolting would be better. At the time I could not figure out a way to access what would be buried nuts, I even called the factory and asked their advice. They said they just drive big screws into the top of the fiberglass gunwale.
So now I have to fix a problem I saw coming years ago. Fortunately I have been here before.
The problem is, I have four holes in a rectangle about 2 x 3 inches with #14 screws ripped out, leaving me shredded fiberglass about 1/2" deep.
What I did: I used the screws like a saw and ran them in and out cleaning out loose fiber and old bedding compound. This also tended to enlarge the holes marginally which doesn't matter.
I then mixed up a itty bitty slice of JB Waterweld. Waterweld comes in a putty stick form and is quite stiff, like plumbers putty. It is a two part epoxy, the center of the stick is one part, the outer layer is the other part. You simply cut off the amount you need, mush it together between your fingers until the color is uniform, takes very little effort or time.
Next I rolled it between my fingers into a worm like shape that would slide into my reamed out screw holes. After a few mis-trys I got a good fit. Next I took a small (skinny sheet rock nail) and worked it into my worm filled hole in a circular fashion, pushing the putty into the surrounding glass fibers and void.
Next I took the #14 screw and screwed it into the center being careful to make sure the screw drew down into the mixture as I turned it.
Because there is not enough room for putty and screw in the hole, the excess putty is forced into the fiber and oozes out the top and bottom. I have done this on jobs that are visible, so I know that it happens.
Very important: Next I let it begin to set up which is only 2-3 minutes after mixing. I keep working the screw in and out a few turns so that it does not adhere to the putty. Once the putty takes its initial hardening set, I remove the screw and wait until it is good and hard before setting my base plate in polyurethane and spin the screws into their new custom threads. (I waited overnight this time, but I have done less critical repairs in ten minutes)
This method works well if you do not have access to the bottom side. If possible and time permitted, I would have sealed the back side with tape, and poured epoxy into the area so that it flowed into the damaged fiber, and then drilled and tapped or used a bolt. Pouring epoxy into a bottomless hole makes a real mess inside the boat.
I wrote about JB WELD products in an earlier posting where I was bending SS tube and I had to repair damaged screw holes after drilling out broken screws.
This system has worked very well for me, however I would much prefer through bolting and using backing plates for far superior strength.
Note: JB Weld makes Waterweld and is available all over. JB also makes many of the products you may already be familiar with only under different names.
Lesson to learn: Don't push or pull on stanchions!
Propane range install
This winter at Christmas was the last straw, Our Dickinson Bristol diesel stove belched black soot all over my top sides and cockpit for the last time.
Then it rained and greasy black snot ran down the windows and cabin walls. It was my fault for turning off the blower fan, but I have had it. The cast iron monster is either becoming an anchor or going up for sale.
I haven't started the conversion yet, but I ordered a stainless steel RV stove on E-bay. My initial research revolved around answering the question of whether to get a so called marine unit versus a unit built for campers and trailers. All the used marine units I checked out were from company's out of business. I chose to buy a brand new dented Dometic, that way I know parts are readily available.
People have said positives and negatives for marine versus RV.
Safety safety safety, if its not designed for marine, how do you know its safe in a boat? is a common comment.
If its not marine it wont hold up, is another statement.
Your insurance will be voided.
Your stupid for not hiring a yard.
More to come - delivery of my new stove is this week. $315 on e-bay including shipping - has a dent in back - looks great. The cook top has an igniting sparker I paid extra for.
Okay I got the stove/range, it looks like a perfect fit for my space once I pull out the Dickinsen. Bad news - the enamel grill and cook top easily lift off or will fly off in a seaway. I will devise a positive restraint system.
I also received my 12 foot hose and regulator, I calculated I need 9 feet. I plan to use a standard barbecue propane tank. I wrestled with what tank to use and decided that since it will rust in a year or two, I wanted a cheap readily available replacement. I know galvanized or fiberglass ones are out there for lots of boat dollars but not this boat. The tank will mount on the back of the cabin where my current diesel day tank is mounted. I need to figure out a bracket and cover so I don't have to look at it.
I am wrestling with whether to put in a solenoid valve. I don't like the idea of more fittings or electrical load.
More later, its Jan 12, 2018, I have plenty of time.
I decided I needed to test the set up before moving ahead.
Linda said, "your not lighting that in the living room," I said "I already have," she said, "is it turned on out there now." getting louder. "No, of course not, I turned it off, I'm not stupid."
The truth is, if this thing can't run safely in my house, I sure as hell don't want it in my boat.

 Properly installed fittings don't leak, but you need to use soapy water to test. I checked all my work plus the factory crimps and everything I could get to.
 the stainless steel front looks good, I hope it stays that way, I know it is subject to scratching.
 All the hard work is still ahead of me in this project. I can smell breakfast and cookies already.
My boat has never had a blower, apparently in theory diesels are immune to explosions. Linda has long lobbied for a bilge blower to remove odors. Bringing propane on board has me agreeing. My new Atwood blower and Honda kicker impeller arrived yesterday, I am beginning to become overloaded with things needing finishing or starting.
I started dismantling today, and the old diesel stove got me again, while taking apart the stove pipe, I tried to be gentle but still managed to dislodge and dump a pile of soot, aarrrgh!
I have slid the cast iron stove out of its nook and it is sitting on a milk crate, the oil lines are dripping into a cup. I don't have the strength to lift it off the boat. I need a strong person to unwittingly stop by the house and carry it down the ladder for me. (my daughter showed up, she saved my back)
Okay I got the stove/range, it looks like a perfect fit for my space once I pull out the Dickinsen. Bad news - the enamel grill and cook top easily lift off or will fly off in a seaway. I will devise a positive restraint system.
I also received my 12 foot hose and regulator, I calculated I need 9 feet. I plan to use a standard barbecue propane tank. I wrestled with what tank to use and decided that since it will rust in a year or two, I wanted a cheap readily available replacement. I know galvanized or fiberglass ones are out there for lots of boat dollars but not this boat. The tank will mount on the back of the cabin where my current diesel day tank is mounted. I need to figure out a bracket and cover so I don't have to look at it.
I am wrestling with whether to put in a solenoid valve. I don't like the idea of more fittings or electrical load.
More later, its Jan 12, 2018, I have plenty of time.
I decided I needed to test the set up before moving ahead.
Linda said, "your not lighting that in the living room," I said "I already have," she said, "is it turned on out there now." getting louder. "No, of course not, I turned it off, I'm not stupid."
The truth is, if this thing can't run safely in my house, I sure as hell don't want it in my boat.

I ran all the burners and the oven simultaneously to make sure the system worked. The flexible hose is 12' feet long without splices, it is crimped onto the regulator ($19.95) it will get buried in the walls replacing my diesel hose. The barbecue tank has rust on the base, I need to design a rust proof bracket. I have learned the hard way that rust stains are just about impossible to remove from gel coat and bleed through paint. Maybe I will coat the base with plastigrip and set it on starboard.


My boat has never had a blower, apparently in theory diesels are immune to explosions. Linda has long lobbied for a bilge blower to remove odors. Bringing propane on board has me agreeing. My new Atwood blower and Honda kicker impeller arrived yesterday, I am beginning to become overloaded with things needing finishing or starting.
I started dismantling today, and the old diesel stove got me again, while taking apart the stove pipe, I tried to be gentle but still managed to dislodge and dump a pile of soot, aarrrgh!
I have slid the cast iron stove out of its nook and it is sitting on a milk crate, the oil lines are dripping into a cup. I don't have the strength to lift it off the boat. I need a strong person to unwittingly stop by the house and carry it down the ladder for me. (my daughter showed up, she saved my back)
 |
| I think it looks good! I added a sea rail to keep things from sliding off |
The stainless steel sea rail was the only part of this install I am not happy with. I couldn't find a piece of polished metal so I bought a 48" piece of mill finish 316 for $12.50 plus $15 postage plus a kit of five angle grinder discs from Harbor Freight for another $17. The final result is not mirror perfect but is better than nothing and shouldn't rust.
 |
When I first insulated the diesel stove which got fiery red hot, I lined the walls with Hardy cement board first, followed by stainless sheeting with a 1/2" air gap. The new propane stove is insulated and does not require any special protection but I kept it anyway. Routing the propane hose required me to totally dismantle all of the firewall. |
 |
| Goatee our ships cat inspects his galley before I attached the sea rail. |
 |
| I re cut my plywood counter top to fit inside the new sea rail |
 |
| what is it ? |
 |
| I considered several factory brackets and decided I could do better. I built several plywood mock-ups before cutting any starboard. The wire rope is a retired halyard. I made the backboard fit the same mounting holes used for the removed diesel day tank. Out of sight, I ran the cable through a hole in the starboard and doubled back. I used cable clamps with six inches of extra cable in case I need to adjust it someday. |
 |
| I slipped three little starboard feet under the rusty base, here's hoping I don't get any rust. In the future, I will install a solenoid shut-off valve in this section of the hose. I used about $25 worth of 1/2" starboard. Interestingly these tanks are not perfectly round, nor are the top guards all the same. I spent a lot of time making my bracket fit an empty tank only to find out my full tank was a little different. |
 |
| I bought this cheap $12 vinyl cover online, I extended the velcro straps to go around my bracket. I am keeping my eye out for something better looking. I may paint a happy face or attach a decal later. |
Follow up: The stove install is a huge success, we don't miss the diesel cooker one iota except on the coldest nights. We have gone through one summer and most of the winter and not brought out the old Coleman camp stove even once.
We have been using the three burner cook top to heat the boat. I know it is not recommended because you are using up your oxygen but out boat leaks drafty winds like an open door. Here is my performance assessment, one burner on low heats us on a mild day, one burner on high makes a noticeable difference. Two burners on high really beats back a cold breezy day. Three burners on high, is way too much and makes us too hot in minutes. You should know, I installed a four inch double fan near the cabin roof above the stove to direct the heated air. The fan was an awesome improvement. Also burning a propane flame inside the boat steams up the windows (I knew that) My rotating windshield fan keeps the front window clear. Two alternatives come to mind, one is a hydronic heater running off the motors closed loop coolant, but this would require running the motor. The other alternative would be a diesel furnace which would require some DC electricity, $1,500 plus my labor and we would still not have a oven or stove top. I am happy with what we did and how inexpensive it turned out but am not closing the door on a furnace some day should we embark on some long distance trips.
Arrrgh
rusted / busted axle Arrrgh
I just tore apart my 5hp kicker Honda for the fourth time. Why? Because I let my impeller go too long when I knew it was
self destructing.
The problem is that ( at least I thought ) I didn't find all the little pieces of rubber and they keep plugging up the water passage. If I would have replaced it at the first sign of trouble or better yet before any trouble began I wouldn't be fighting with it today. Consequentially I can't trust it to not overheat and leave me stranded somewhere. Fortunately it's my sailboat and doesn't need a motor to get home.Update You wont believe this disgusting discovery. After some more tear downs I found half a dozen insect larva's plugging up the works. I have tried wire fishes and high pressure air to no avail. Apparently some insect crawled in my water inlet or tell tale hole and laid her babies while the motor was stored. Now I am covering all openings with tape during storage. I hope the rest rot and get spitted out but right now I am only getting half my cooling water at full throttle and none at idle - arrrrrrgh!
Another update, it overheats now and quits running after ten minutes, I think the head gasket is blown. I switched to my other kicker. I need them both next summer, so I will have to fix it.

I used a piece of SS I salvaged. It has a two inch lip at the back and a one inch folded front edge which makes it very rigid. The holes at the bend are for drainage but in actual use my table top barbecue has its own drip tray.

I added side boards. The hook boards are through bolted (okay, big ass screws) so there is no possibility of splitting.

Due to the curved rail, this table is very well supported and has no tendency to tip. I cut the hooks so it is a tight fit over the one inch tube and simply force it on. We have been using this table for about seven years now, it is about ready for a refinish but I have no complaints. I would do the same thing out of plywood or even Pergo flooring if I hadn't already had the stainless steel.
Another update, it overheats now and quits running after ten minutes, I think the head gasket is blown. I switched to my other kicker. I need them both next summer, so I will have to fix it.
Non ethanol gas
A few years ago I started using non-ethanol gas in all my little motors, outboards, gens, pressure washers, lawn mowers etc.
The improvement is fantastic, rough idles, hard starts non-starts have all but been eliminated. Plus I have read that regular gas has a shelf life of about three months before it separates, whereas without the alcohol, it may be stored for years. When I shut down my motors for the season I run the tanks dry to avoid gelling over the winter.
Cock pit rail table
I came up with this little table trick because I had a table top barbecue with short folding legs that we move out to a picnic table or dock sometimes. Most boat barbies clamp on a rail which is okay but somewhat limiting. Plus the table has a myriad of other uses. The key to this system is a curving corner rail, and a hooked connector.

I used a piece of SS I salvaged. It has a two inch lip at the back and a one inch folded front edge which makes it very rigid. The holes at the bend are for drainage but in actual use my table top barbecue has its own drip tray.

I added side boards. The hook boards are through bolted (okay, big ass screws) so there is no possibility of splitting.

Due to the curved rail, this table is very well supported and has no tendency to tip. I cut the hooks so it is a tight fit over the one inch tube and simply force it on. We have been using this table for about seven years now, it is about ready for a refinish but I have no complaints. I would do the same thing out of plywood or even Pergo flooring if I hadn't already had the stainless steel.
Our summer cruise just went all to pieces along with my trailer axle. The axle rusted through and we almost lost a wheel. I spotted the angled wheel problem as we were pulling out of the driveway, all packed and on our way. Or so I thought.
I have warned readers before about taking care of routine maintenance before it bites you back. I diligently rinsed my trailer after salt water dunking whenever I could but thirty years and other owners had taken its toll. Not only are the axles shot but some of the springs broke while taking them off as well. I have spent most of my allotted vacation working on replacing my axles and springs.While disassembling things I realized I was very lucky, my problem was much more severe than I suspected, worse yet it was quite obvious. I totally blew it and now am paying the price missing my planned trip to Victoria. Oh sure, I can make the trip later on but I had to give up my hard earned ( paid for ) dock reservations for Canada Day.
The story is far from over, so far I have replaced one axle and spring set and got the trailer working again, the other axle will wait until this winter during Christmas Ships parade time. I know, intentionally waiting for it to be cold, dark and wet makes no sense.
 |
This is my second axle, I neglected to get a picture of the first one that actually had rusted until it began to bend. Layers of rust are flaking off of both the axle and u-bolts. |
 |
For the second axle I had intended to simply clean up and reuse the brakes but after pulling the hubs I hurriedly ordered a new brake set. You can see the magnet has lost its mounting connection and the linings are paper thin. You can order just the shoes but in my opinion buying new plates with everything already assembled is a no-brainer for about $40 per side. Doing a simple trailer brake job is as simple as removing five small bolts and splicing the wires. Of course you must pull the hubs so you may as well grease the bearings while you are at it. The mess in the picture is a result of way too much grease over thirty five years being pumped in through bearing buddies. Spring loaded bearing greasers hold the grease under constant pressure so the grease slowly oozes through the seals resulting in too much grease.The excess grease oozes out the inner seal, mixes with brake dust and eventually gets flung around coating everything. Add more grease, dunk regularly in water and the result is predictable. The good news in this picture is that the purple grease on the axle is in good shape and the bearings were fine. Everything in this picture gets tossed except the five small nuts holding the plate to the axle and I have no love for them either. (more good news, the new plates came with washers and nuts) I ended up replacing everything. One spring leaf broke during disassembly so I replaced all four of them as well. To add insult to injury I had to re-position my fenders to clear the tires due to the new axles being 1/2 inch longer.Mechanics note: I am no stranger to bearings, axles and brakes and over many decades have learned to double check my work and others. And so after getting everything back together and driving about ten miles reloading the boat I jacked each wheel to check end play. During the axle job, I replaced everything but reused the bearings and hubs. Prior to final assembly I slid the bearings on to the new axles to verify a perfect fit. So far so good. When I raised the wheels off the ground, I discovered both of the second axle bearings were sloppy loose, it took two full turns of the nuts to tighten the bearings. I have no explanation except I failed to properly slide them home, apparently tightening the nut and then backing off didn't do the job. The first axle was perfect with no change. Checking the end play after a short drive probably saved me a failure, I think I will check the play again in a few more miles. FYI the new Dexter axles are 'easy lube' doing away with the need for Bearing buddies. I like the easy lube feature because the grease enters at the inner bearing and exits out the outer bearing where you can see it. As long as your seals are working, easy-lube will keep the brakes clean and you can't over grease. |
Diesel heater install
Okay, since switching the diesel cook stove for a propane unit and trying to heat with it with so so results, I have talked with a fellow boater that said he had a Chinese knock off of a big name marine heater and it only cost $125 (search "parking heater," there are lots of them online)
A week later my diesel heater kit arrives. I was very nervous and suspicious, the instructions were pretty much useless and the contact e-mails were not answered, however with some u-tube help and experimenting I got it working.
 |
| My suitcase heater It really is quite small for such high performance. To gain some perspective, that plywood box at the bottom is about six inches by seven inches and protects the pump and filter and electrical plug from salt spray. That orange cap is the diesel fuel tank and is bolted to a piece of plywood, the heater itself is bolted to the other side of the same piece. The corrugated one inch exhaust tube was really hard to bend until I heated it red hot with a propane torch. That's a 3/4" copper el that I split with a hacksaw and clamped on the end of the muffler to divert the hot gas. I set the whole thing on two layers of foam after finding out that the pump shook the cabin roof with its non stop tat at at ta tat tat tat tat tat tat and so on. |
 |
| You can see the four inch dryer hose wraps around my propane tank and enters through the open porthole. I cut a plywood disk to make a tight seal in the porthole frame. Yes I am preparing for our annual Christmas parades (15 nights) and this suitcase heater will be greatly appreciated. Next summer I may or may not leave it in place for the San Juan's. |
Due to my product mistrust and not wanting to really tear apart the boat I opted to build a suitcase heater (my words). I took all the components, including the fuel tank that came in the kit and assembled them compactly into a cube about 16 x 16 x 16 inches. I tied my heater on the back roof and ran a four inch dryer hose through a port hole three feet away. I ran a 12V power cord (using a flat trailer light plug for disconnect) into the engine vent directly to one of my big batteries using the inline fuse in the kit. Inside the cabin at the porthole I modified a flat dryer vent quick connect and directed the air flow downward.
I sewed a sleeve out of old sail cloth to protect and disguise the flimsy aluminum dryer hose.
That's it, install complete, it takes about two minutes to remove or install my suitcase heater.
Performance
After some u-tube sleuthing, I figured out how the controls work and fired it up. It has about ten heat settings. On low the heater sends out a stream of hot air that is substantial and so hot you may not touch the metal duct I used inside the cabin. On high it is an absolute blast that you can feel across the cabin and you can't hold your hand in the air stream for more than a few seconds. This heater cranks out the btu's, I'm guessing 15,000 or more btu's and 500 CFM on high. It out performs the electric heater, the propane stove and my Mr big buddy all combined and then some. There is no smell inside, outside is a one inch very hot exhaust that doesn't smoke once it cranks up.. It does make a muffled roar that sounds a little like a jet turbine. I am kinda glad it's not in the bilge somewhere as I originally planned. So far I'm super impressed.
Follow up: I have run it through an entire fuel tank over a period of a couple weeks and it has performed flawlessly. Most of the time we started out on high but quickly reduced the setting to low after ten minutes. It really has made the boat a wet/cold weather oasis under way or at the dock.
Update: it has been a number of seasons now and the led display on the control unit has quit. All the buttons still work but I have to guess at what I am doing. I don't use the unit much because the oven actually works well, so I won't be changing anything anytime soon unless I stumble across a nearly free controller with a matching plug.
Bombay Project
Catalina 25 Project
To better organize things, there are new pages for the New Bombay pilothouse project and the Catalina 25 project
Bombay Project
Catalina 25 Project
To better organize things, there are new pages for the New Bombay pilothouse project and the Catalina 25 project
New to me goop
Over my many years I have tried just about every adhesive and caulk that comes in a caulking gun cartridge. I am pretty much settled on never using silicone (rtv) except to bond aquarium glass because of it's contamination effect. A while back I tried some clear gutter sealant from Dap. I don't know what it is made of but it is not that horrible sticky forever butylene and it is paintable which means it is not silicone. I fixed the gutter and then I reattached the floppy sole of my shoes. The remainder in the tube slowly hardened over a month or so but I used it for several more little jobs before tossing out the rest. Fast forward - I needed another tube and found in the Dap section something called "ultra clear" I am sure it is the same stuff I used on my shoes, I bought a $10 tube and sealed up a starboard patch on my boats deck. (nothing sticks to ( HDPE ) starboard. I applied a thick bead and partially tightened the 6" round patch allowing the goop to squeeze out a little, a week later I fully tightened the screws compressing my made in place gasket. On the label it says "stays crystal clear, never yellows," if that's true, I think I have found a great new product. Note, this does not mean in any way I won't be using polyurethane where appropriate. Solar PanelI just bought a 100 watt panel, (I have no idea what that means in boat talk but it is about 22" x 44") and have been experimenting with aiming it at the sun by leaning it against type 4 cushions on the roof.
|


Feel free to add your own ideas in a comment box below this one. - you may even poke fun at my ideas. John
ReplyDelete